アプリ開発でよく使うコンポーネントである、複数の項目を選択する CheckBox と、候補から1つの項目を選択する RadioButton の使い方を解説します。
目次
チェックボックス (CheckBox)
複数の候補の中から、1つ以上の項目を選択する時にはチェックボックス(CheckBox)コンポーネントを利用します。チェックボックスは ON と OFF の2つの状態を持ち、クリックするたびに2つの状態が切り替わるお馴染みのコンポーネントです。
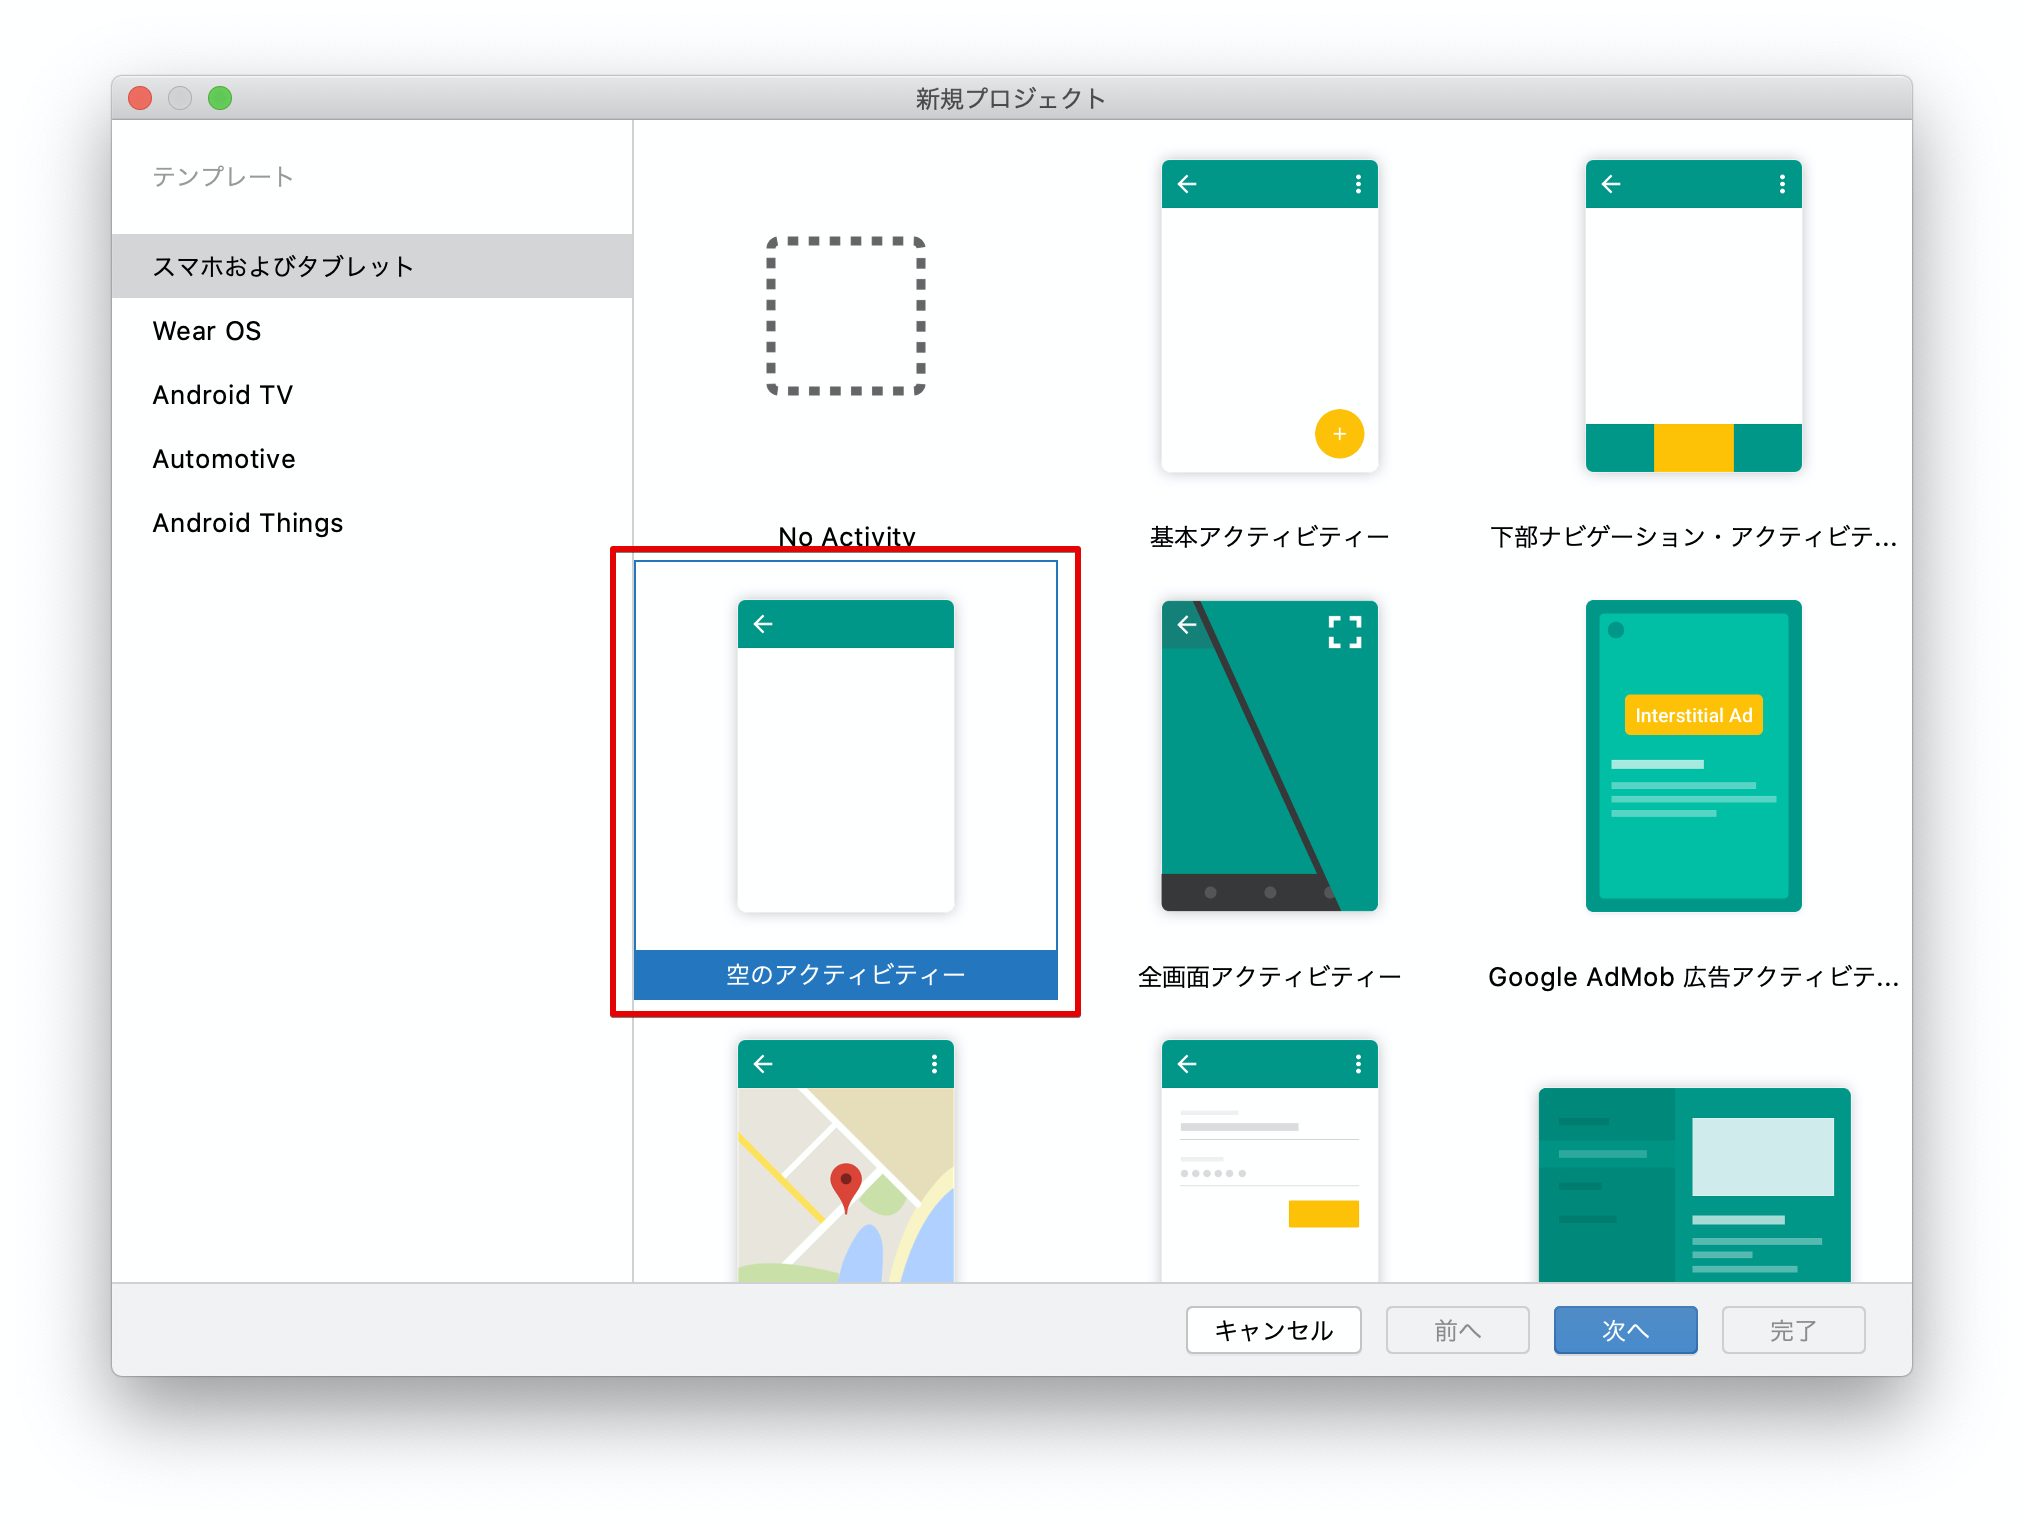
早速、チェックボックスを置いた画面を作成し、実際に動きを確かめてみましょう。Android Studio を起動し、[新規プロジェクト] から [空のアクティビティ] を選択し、プロジェクトを作成します。
まだ、Android Studio がインストールされていない場合は、以下の記事でPCへのインストール方法を詳しく解説しています。
【関連記事】
▶Javaで簡単なAndroidゲームアプリを開発(環境準備)
activity_main.xml を開き、パレットから CheckBox を画面に配置します。
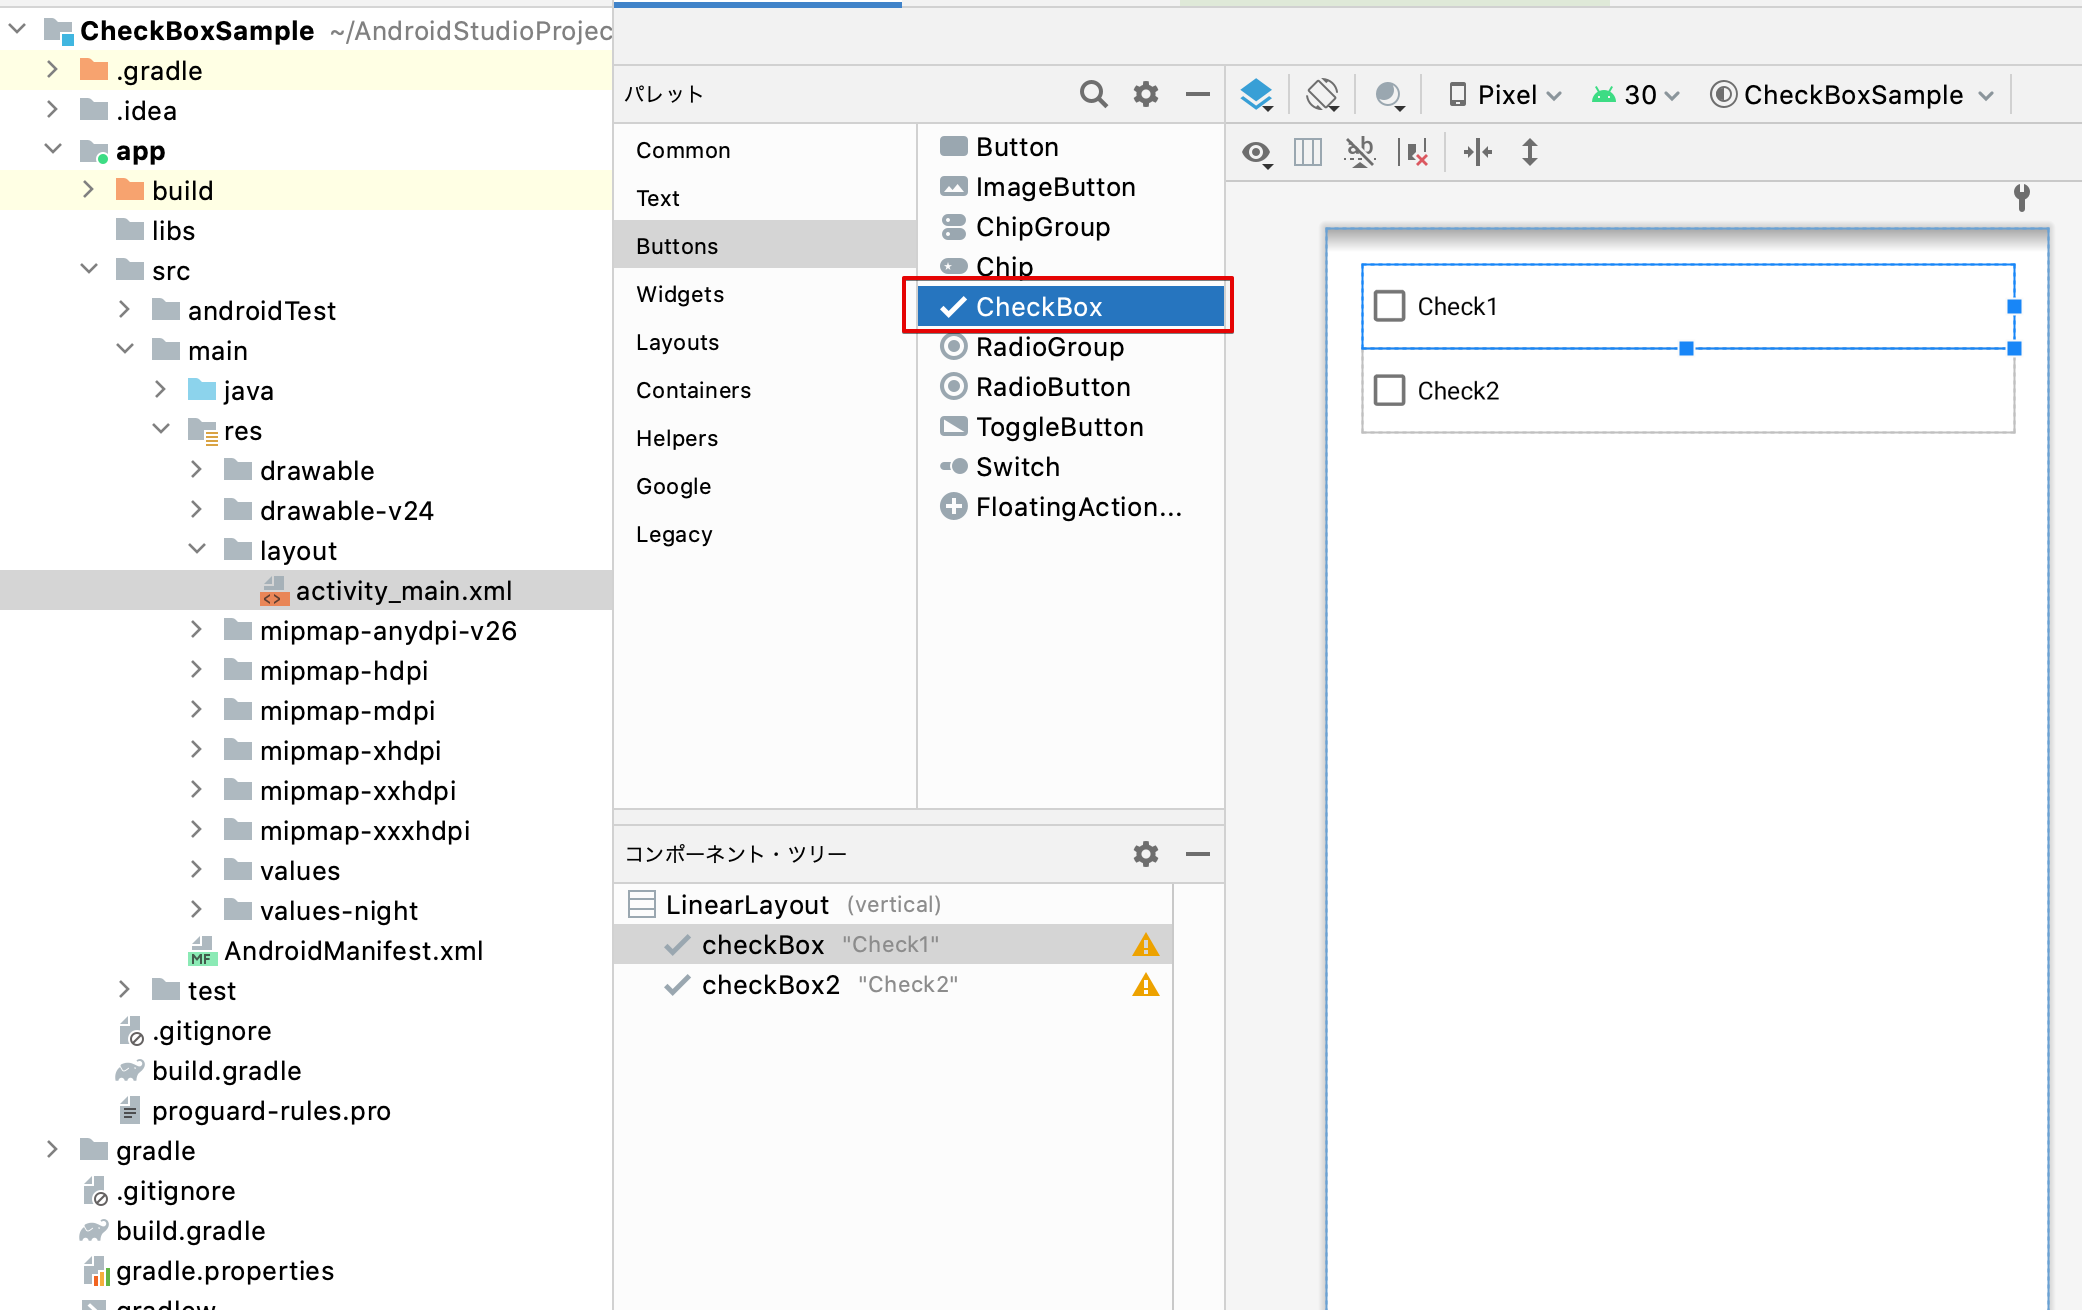
レイアウトのXMLは次のようになります。
<?xml version="1.0" encoding="utf-8"?>
<LinearLayout xmlns:android="http://schemas.android.com/apk/res/android"
    xmlns:app="http://schemas.android.com/apk/res-auto"
    xmlns:tools="http://schemas.android.com/tools"
    android:layout_height="match_parent"
    android:layout_width="match_parent"
    android:orientation="vertical"
    android:padding="20sp"
    tools:context=".MainActivity">

    <CheckBox
        android:id="@+id/checkBox"
        android:layout_width="match_parent"
        android:layout_height="wrap_content"
        android:text="Check1" />

    <CheckBox
        android:id="@+id/checkBox2"
        android:layout_width="match_parent"
        android:layout_height="wrap_content"
        android:text="Check2" />

</LinearLayout>
動きを確かめてみよう
チェックボックスを配置したら、とりあえずこの状態でアプリを実行して、チェックボックスの動きを確かめてみましょう。
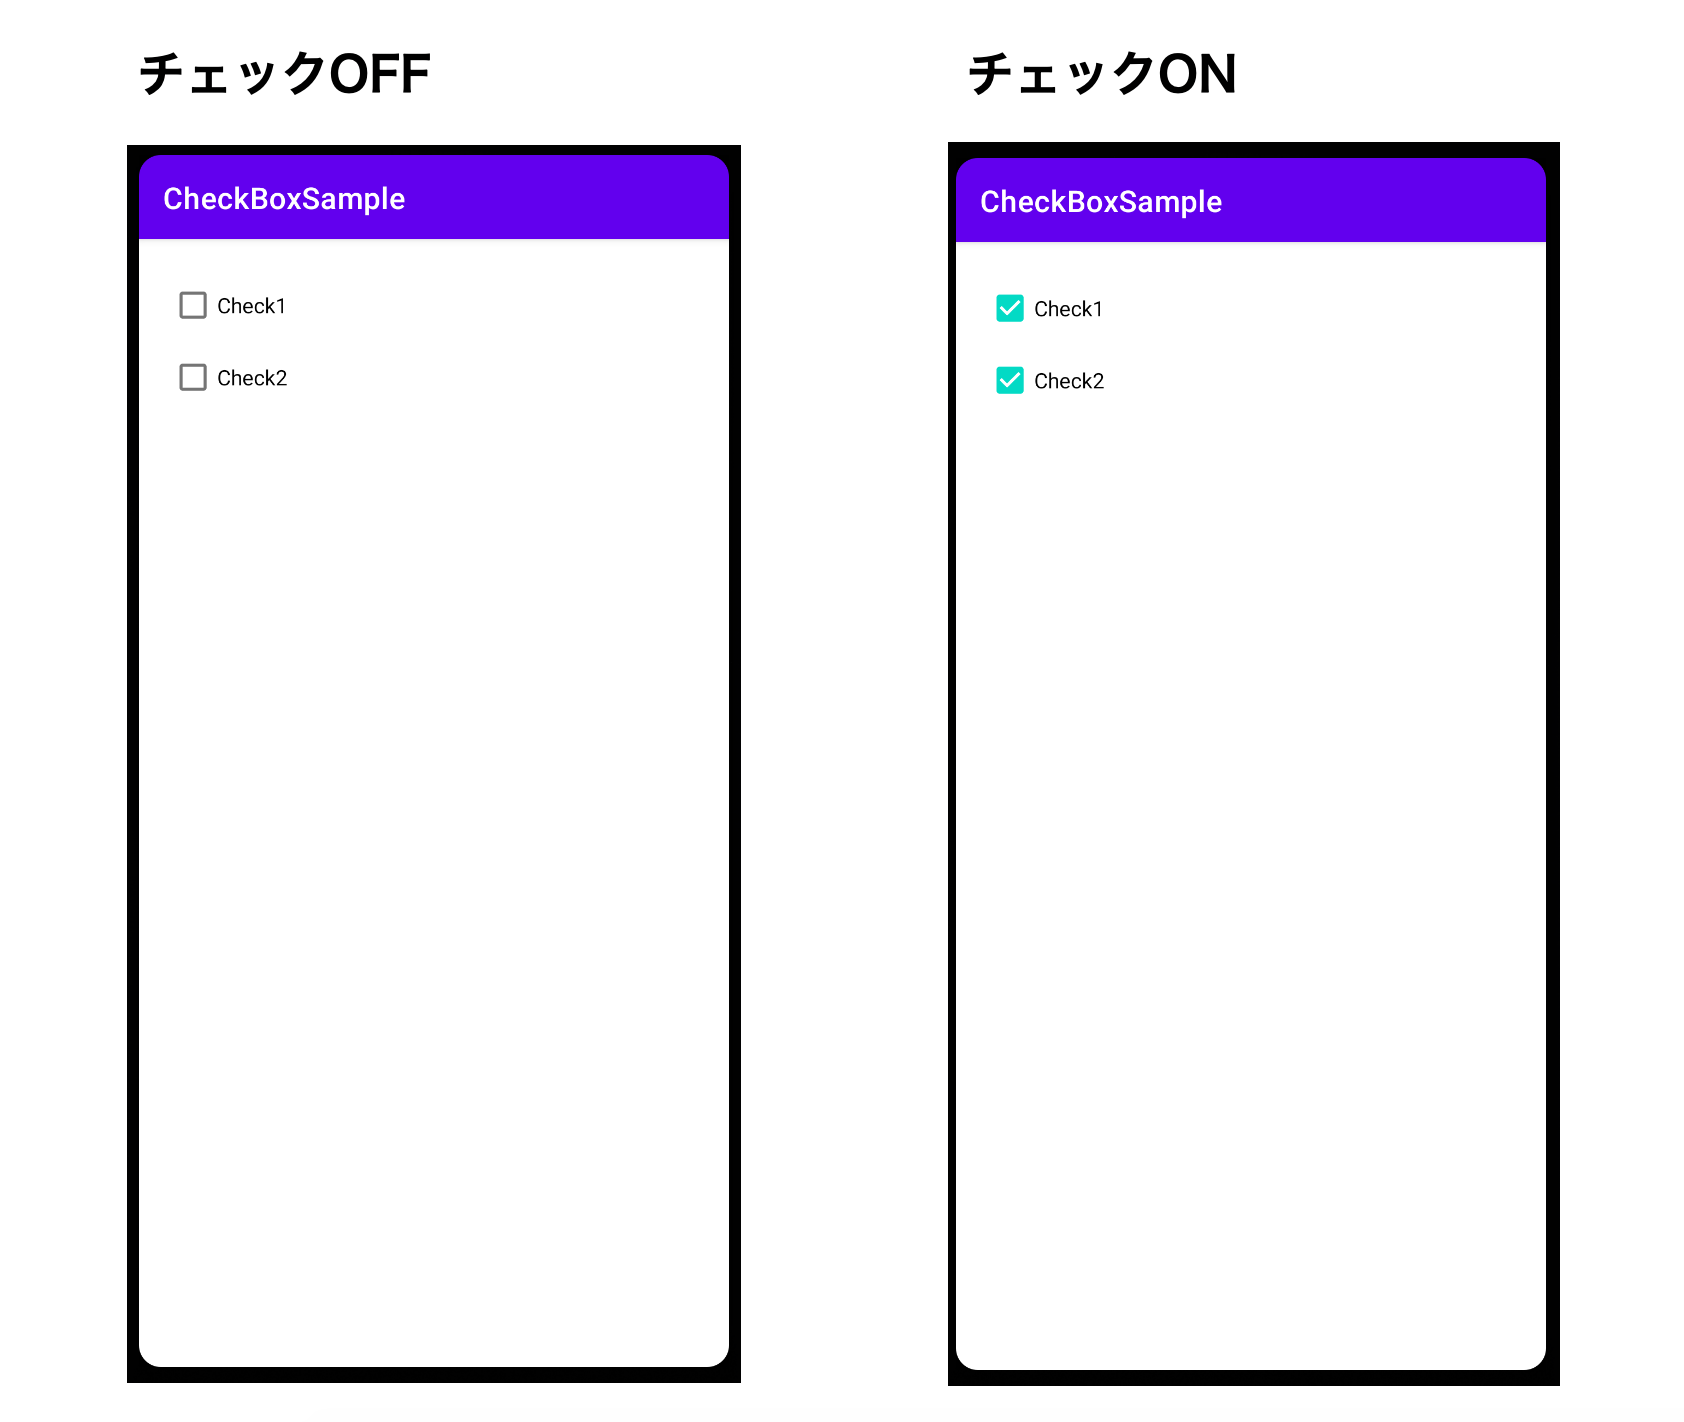
起動すると次のような表示となり、チェックの部分もしくは、文字をクリックするとチェックON/OFF の状態が切り替わります。
チェック状態を切り替えたイベントを取得する
チェックボックスの ON/OFF を切り替えたタイミングで何か処理を行う場合は、Click イベントをリスニングします。
MainActivity.java を開き、チェックボックスの状態変更を監視するリスナーを登録してみましょう。
public class MainActivity extends AppCompatActivity {

    @Override
    protected void onCreate(Bundle savedInstanceState) {
        super.onCreate(savedInstanceState);
        setContentView(R.layout.activity_main);

        //1つ目の CheckBox を取得
        CheckBox checkBox = findViewById(R.id.checkBox);
        //Clickイベントを設定
        checkBox.setOnClickListener(view -> {
            CheckBox c = (CheckBox)view;
            if (c.isChecked()) {
                System.out.println("ONに変更されました");
            } else {
                System.out.println("OFFに変更されました");
            }
        });
    }
}
ラジオボタン (RadioButton)
次は、複数の候補から1つの項目を選択する時に使用するラジオボタン(RadioButton)コンポーネントを使用する方法を解説します。ラジボボタンは、複数の候補の中から1つだけ選択するコンポーネントです。
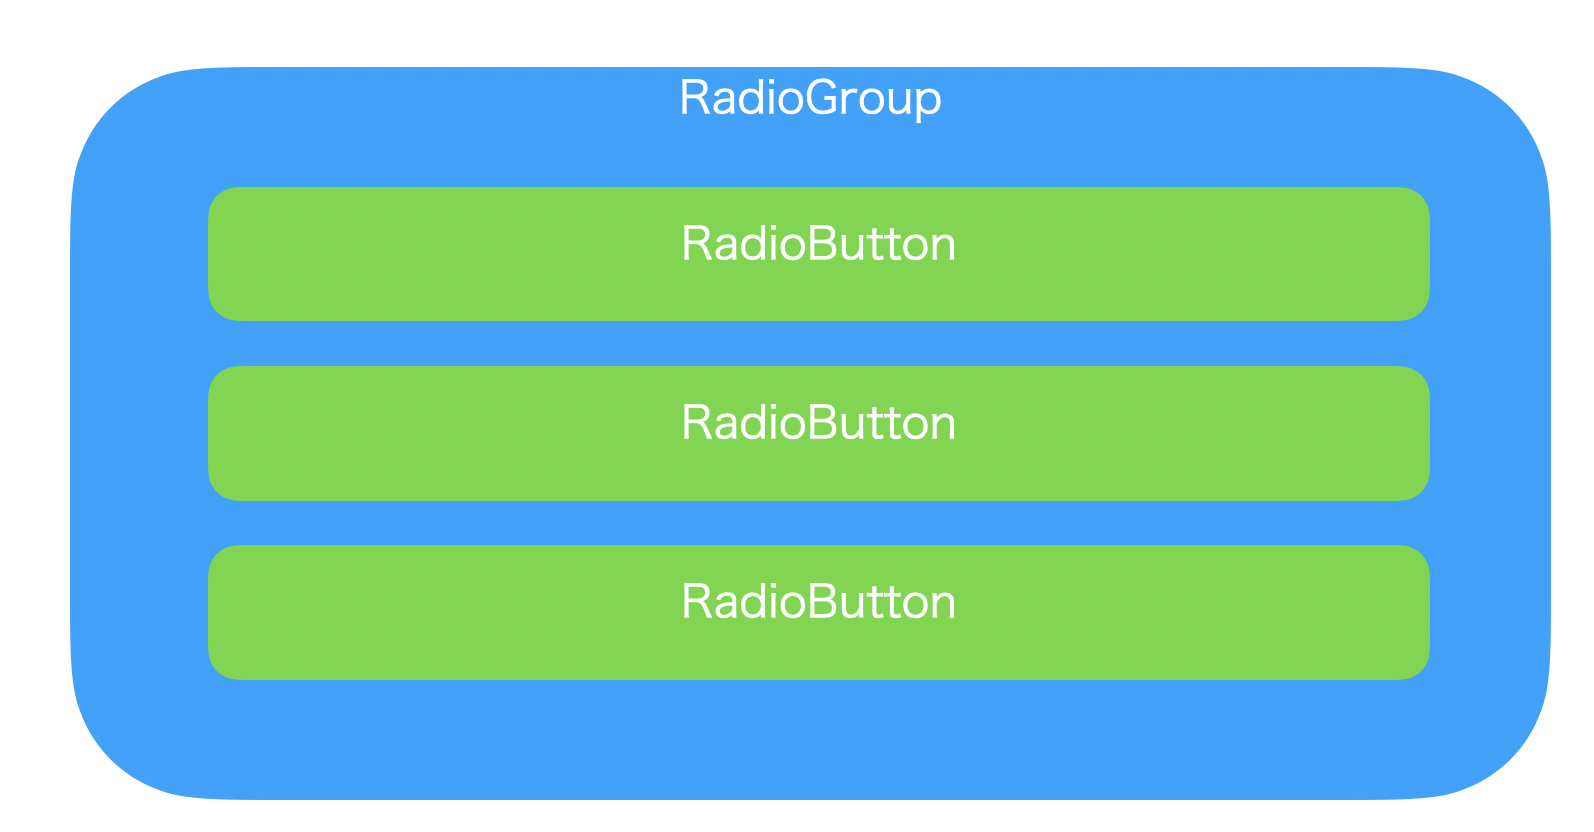
ラジオボタンを使用するためには、RadioButtonとRadioGroup クラスを使用します。RadioGroup に複数の RadioButton を配置し、その中に囲まれた RadioButton の中から1つだけを選択します。
では、RadioButton を実際に置いて、動きを確かめてみましょう。
activity_main.xml を開き、パレットから RadioGroup を2つ、そして RadioGroup の中に RadioButton をそれぞれ2つ配置します。
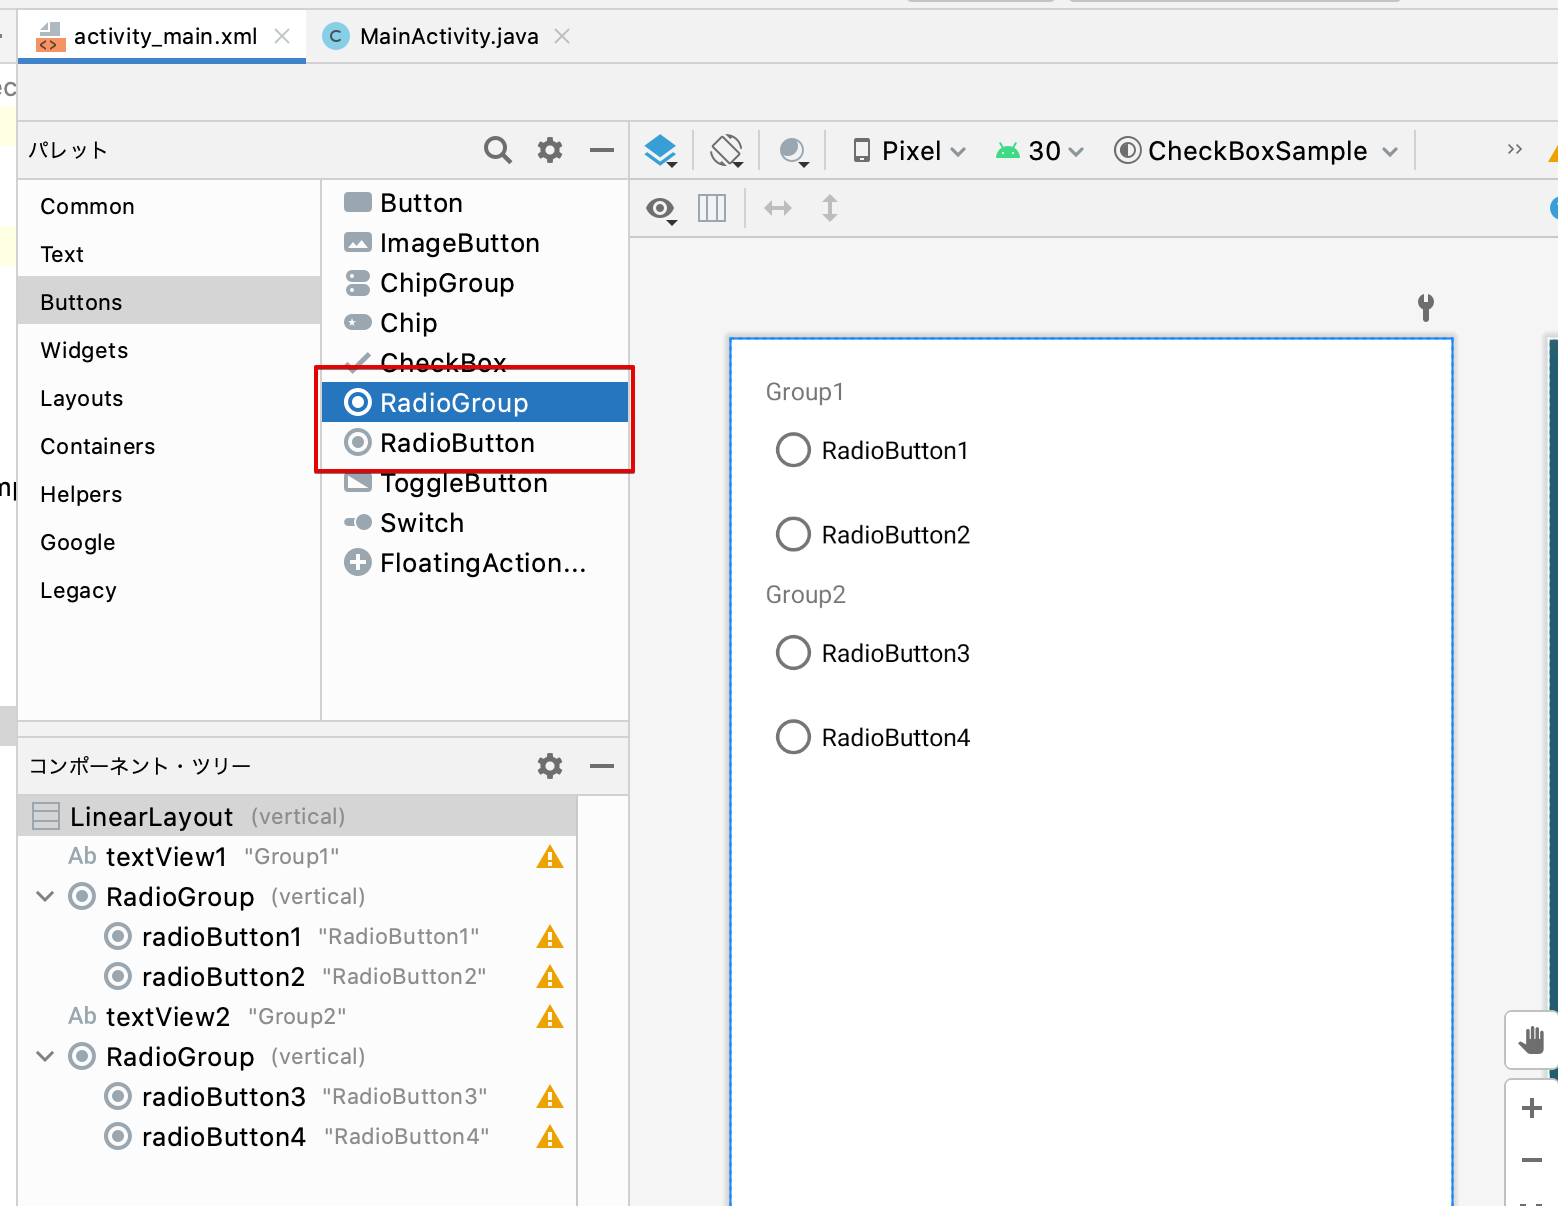
レイアウトXMLは次のようになります。
<?xml version="1.0" encoding="utf-8"?>
<LinearLayout xmlns:android="http://schemas.android.com/apk/res/android"
    xmlns:app="http://schemas.android.com/apk/res-auto"
    xmlns:tools="http://schemas.android.com/tools"
    android:layout_height="match_parent"
    android:layout_width="match_parent"
    android:orientation="vertical"
    android:padding="20sp"
    tools:context=".MainActivity">

    <TextView
        android:id="@+id/textView1"
        android:layout_width="match_parent"
        android:layout_height="wrap_content"
        android:text="Group1" />
    <RadioGroup
        android:id="@+id/group1"
        android:layout_width="match_parent"
        android:layout_height="wrap_content" >
        <RadioButton
            android:id="@+id/radioButton1"
            android:layout_width="match_parent"
            android:layout_height="wrap_content"
            android:text="RadioButton1" />
        <RadioButton
            android:id="@+id/radioButton2"
            android:layout_width="match_parent"
            android:layout_height="wrap_content"
            android:text="RadioButton2" />
    </RadioGroup>

    <TextView
        android:id="@+id/textView2"
        android:layout_width="match_parent"
        android:layout_height="wrap_content"
        android:text="Group2" />
    <RadioGroup
        android:id="@+id/group2"
        android:layout_width="match_parent"
        android:layout_height="match_parent" >
        <RadioButton
            android:id="@+id/radioButton3"
            android:layout_width="match_parent"
            android:layout_height="wrap_content"
            android:text="RadioButton3" />
        <RadioButton
            android:id="@+id/radioButton4"
            android:layout_width="match_parent"
            android:layout_height="wrap_content"
            android:text="RadioButton4" />
    </RadioGroup>
</LinearLayout>
動きを確かめてみよう
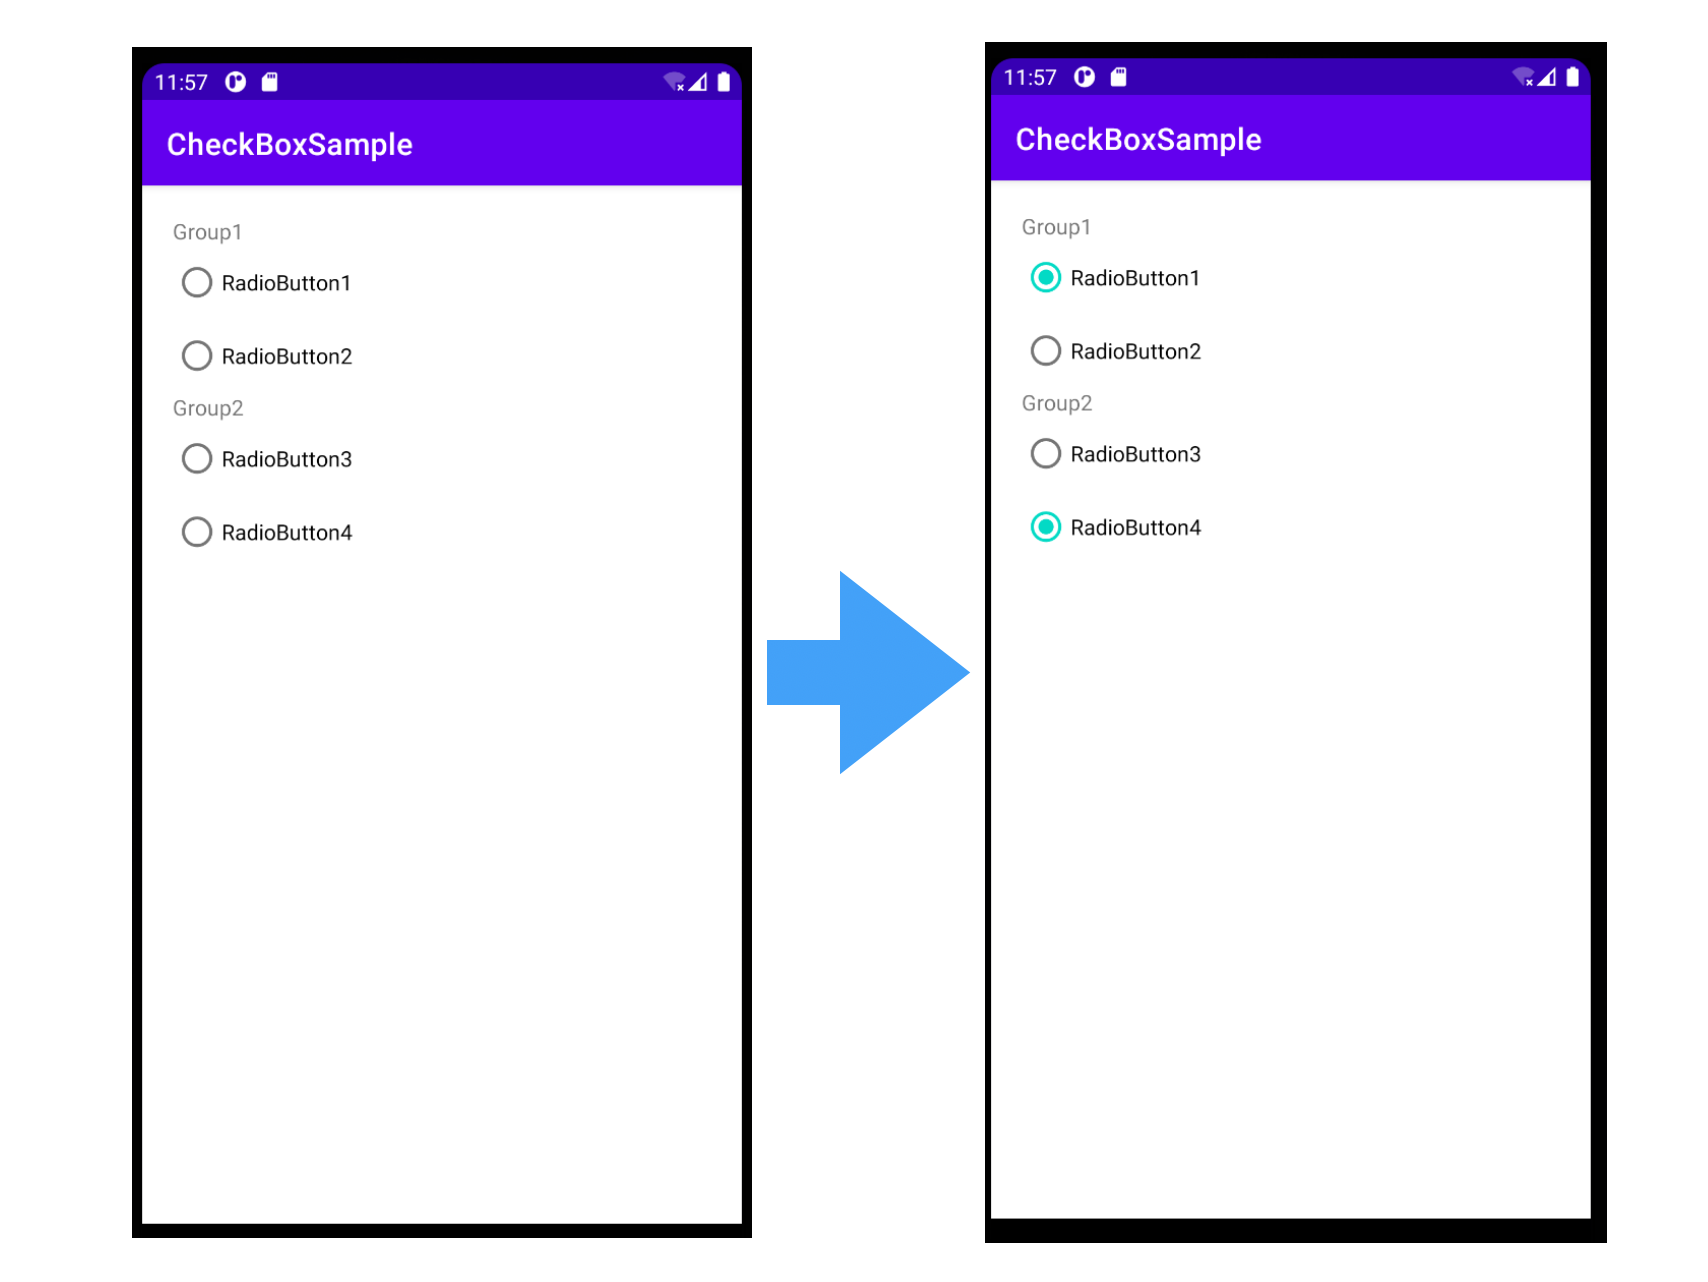
ラジオボタンを配置したら、アプリを実行して動きを確かめてみましょう。
RadioGroup で囲まれた RadioButton の中で1つだけが選択可能になっているでしょう。
ラジオボタンの選択を切り替えたイベントを取得する
ラジオボタンの選択を切り替えたタイミングで何か処理を行う場合は、RadioGroup のCheckedChanged イベントをリスニングします。
MainActivity.java を開き、ラジオボタンの選択変更を監視するリスナーを登録してみましょう。
public class MainActivity extends AppCompatActivity {

    @Override
    protected void onCreate(Bundle savedInstanceState) {
        super.onCreate(savedInstanceState);
        setContentView(R.layout.activity_main);

        RadioGroup group = (RadioGroup)findViewById(R.id.group1);
        group.setOnCheckedChangeListener((view, id) -> {
            if (id == R.id.radioButton1) {
                System.out.println("1つ目が選択されました");
            } else if (id == R.id.radioButton2) {
                System.out.println("2つ目が選択されました");
            }
        });
    }
}
まとめ

Android アプリ開発での、チェックボックスとラジオボタンの使用方法を解説してきました。
この2つのコンポーネントは、アプリ開発の中でも比較的よく使うコンポーネントであるため、ぜひ使用方法を覚えておきましょう。


