Ubuntu 18.04にMySQL5.7をインストールする手順をまとめています。
旧バージョンのMySQLを削除する

まずは、Ubuntu上に旧バージョンのMySQLが存在している場合は削除しましょう。
以下のコマンドで、インストール済みのパッケージのうち、mysql関連の一覧を表示します。
dpkg -l | grep mysql
例えば、以下のように表示されます。
rc mysql-server-5.7 5.7.27-0ubuntu0.18.04.1 amd64 MySQL database server binaries and system database setup
以下のコマンドで、インストール済みパッケージのうち、mysql関連をアンインストールします。設定ファイルやデータも全て削除されるため、必要ならバックアップ等をとっておきましょう。
sudo apt-get purge mysql-*
MySQLリポジトリを登録する

Ubuntu 18.04にMySQL 8をインストールするためにはリポジトリ設定が必要です。
インストールするだけでMySQLの必要なリポジトリ設定をおこなってくれるパッケージがあるので利用しましょう。
下記リンクを開きます。
MySQL :: Download MySQL APT Repository
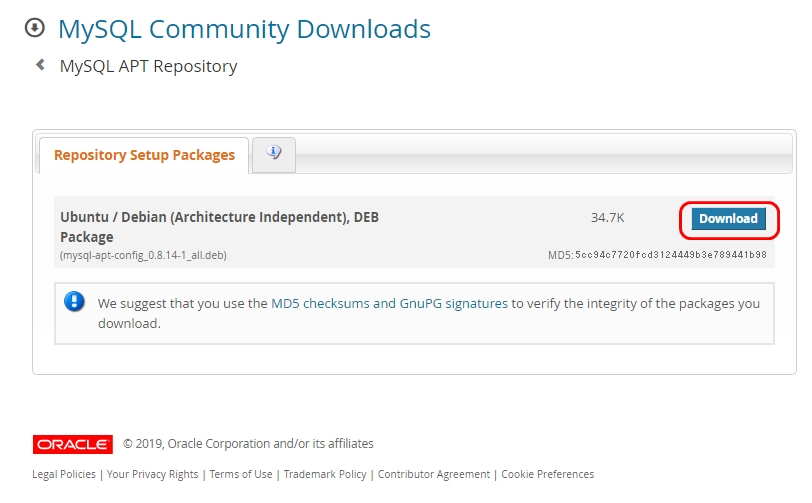
「Download」ボタンをクリックします。
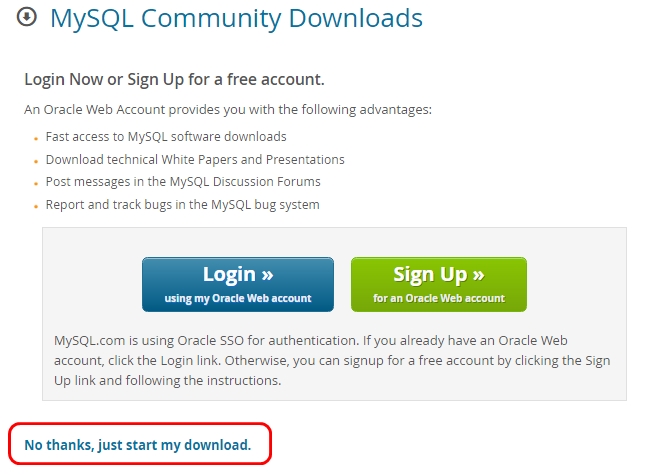
ユーザ登録/ログイン画面が表示されます。「No thanks,just start my download」上で右クリックし、「リンクのアドレスをコピー」(Windowsの場合)します。
Ubuntuにて、wgetのあとに、コピーしたアドレスを貼り付けます。例えば、以下のようになります。
wget https://dev.mysql.com/get/mysql-apt-config_0.8.14-1_all.deb
ダウンロードが終わったら、以下を実行します。
sudo dpkg -i ./mysql-apt-config_0.8.14-1_all.deb
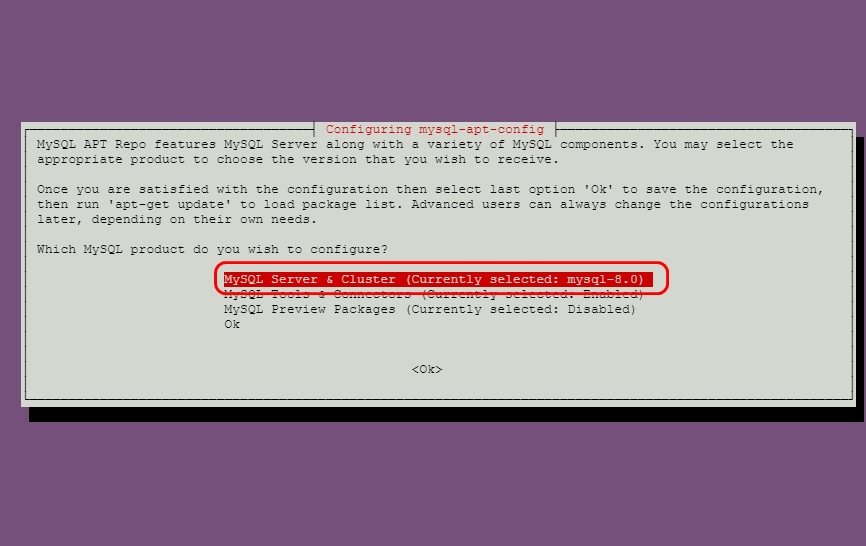
以下の画面が表示されます。今回はサーバをインストールしたいので、そのままキーボードのEnterキーを押します。(カーソルキーの上下で項目の移動が可能です)
MySQLのバージョンを選ぶ画面です。MySQL-8.0を選び、Enterキーを押します。
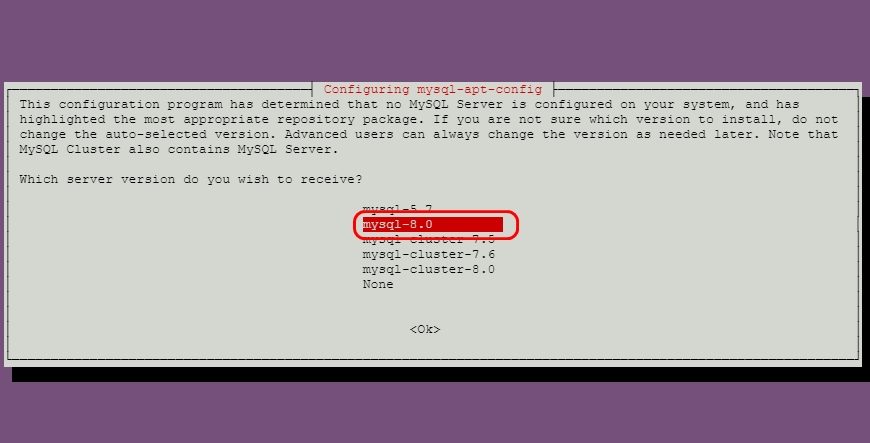
Okにカーソルを移動させて、Enterキーを押します。
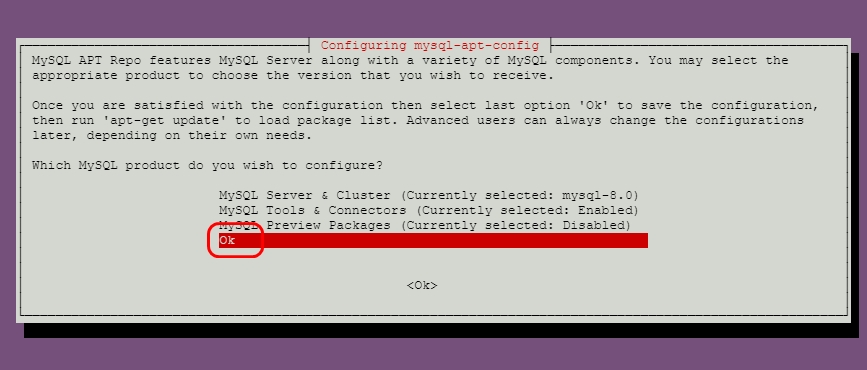
MySQLのリポジトリが設定されます。
以下のコマンドを実行して、パッケージ情報を更新します。
sudo apt-get update
MySQL 8.0をインストールする

以下のコマンドで、MySQL8.0をインストールします。
sudo apt-get install mysql-community-server
下記の画面が表示されるので、MySQLのrootパスワードを設定します。

下記の画面では、再度パスワードを入力します。

パスワードの暗号化方式を決める画面です。そのままEnterキーを入力します。
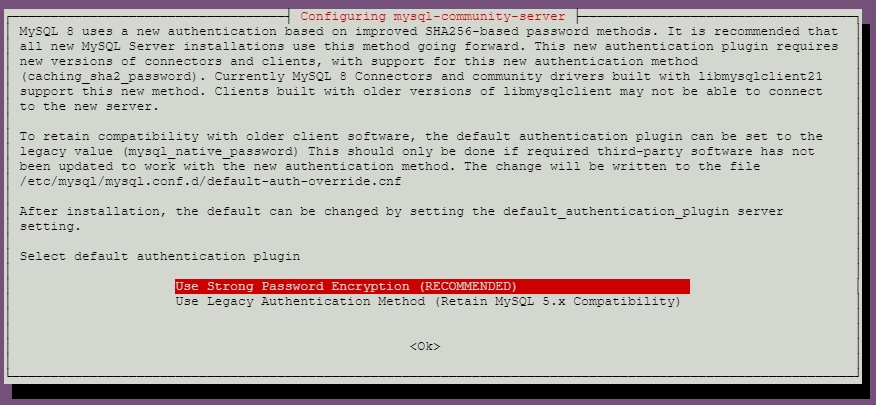
これで、いったんインストールは完了です。
mysqldのバージョンと、インストールされたパッケージを以下のコマンドで確認します。
$ mysqld --version
/usr/sbin/mysqld  Ver 8.0.18 for Linux on x86_64 (MySQL Community Server - GPL)

$ dpkg -l | grep mysql
ii  mysql-apt-config               0.8.14-1                                    all          Auto configuration for MySQL APT Repo.
ii  mysql-client                   8.0.18-1ubuntu18.04                         amd64        MySQL Client meta package depending on latest version
ii  mysql-common                   8.0.18-1ubuntu18.04                         amd64        Common files shared between packages
ii  mysql-community-client         8.0.18-1ubuntu18.04                         amd64        MySQL Client
ii  mysql-community-client-core    8.0.18-1ubuntu18.04                         amd64        MySQL Client Core Binaries
ii  mysql-community-server         8.0.18-1ubuntu18.04                         amd64        MySQL Server
ii  mysql-community-server-core    8.0.18-1ubuntu18.04                         amd64        MySQL Server Core Binaires
以下のコマンドで、最低限のセキュリティ対策をおこなっておきましょう。
$ /usr/bin/mysql_secure_installation

Securing the MySQL server deployment.

※インストール時に設定したパスワードを入力
Enter password for user root:

VALIDATE PASSWORD COMPONENT can be used to test passwords
and improve security. It checks the strength of password
and allows the users to set only those passwords which are
secure enough. Would you like to setup VALIDATE PASSWORD component?

※パスワードポリシーのセットアップ yを入力
Press y|Y for Yes, any other key for No: y

There are three levels of password validation policy:

LOW    Length >= 8
MEDIUM Length >= 8, numeric, mixed case, and special characters
STRONG Length >= 8, numeric, mixed case, special characters and dictionary                  file

※パスワード強度の設定 2(STRONG)を入力
Please enter 0 = LOW, 1 = MEDIUM and 2 = STRONG: 2
Using existing password for root.

Estimated strength of the password: 100
※パスワードを変更するかどうか nを入力
Change the password for root ? ((Press y|Y for Yes, any other key for No) : n


 ... skipping.
By default, a MySQL installation has an anonymous user,
allowing anyone to log into MySQL without having to have
a user account created for them. This is intended only for
testing, and to make the installation go a bit smoother.
You should remove them before moving into a production
environment.

※匿名(anonymous)ユーザを削除するかどうか yを入力
Remove anonymous users? (Press y|Y for Yes, any other key for No) : y
Success.


Normally, root should only be allowed to connect from
'localhost'. This ensures that someone cannot guess at
the root password from the network.

※リモートrootログインを禁止するかどうか yを入力
Disallow root login remotely? (Press y|Y for Yes, any other key for No) : y
Success.

By default, MySQL comes with a database named 'test' that
anyone can access. This is also intended only for testing,
and should be removed before moving into a production
environment.

※testデータベースを削除するかどうか yを入力
Remove test database and access to it? (Press y|Y for Yes, any other key for No) : y
 - Dropping test database...
Success.

 - Removing privileges on test database...
Success.

Reloading the privilege tables will ensure that all changes
made so far will take effect immediately.

※権限テーブルをリロードするかどうか yを入力
Reload privilege tables now? (Press y|Y for Yes, any other key for No) : y
Success.

All done!
mysqlコマンドを使って、データベースの疎通確認をおこないます。
$ mysql -u root -p
Enter password:
Welcome to the MySQL monitor.  Commands end with ; or \g.
Your MySQL connection id is 10
Server version: 8.0.18 MySQL Community Server - GPL

Copyright (c) 2000, 2019, Oracle and/or its affiliates. All rights reserved.

Oracle is a registered trademark of Oracle Corporation and/or its
affiliates. Other names may be trademarks of their respective
owners.

Type 'help;' or '\h' for help. Type '\c' to clear the current input statement.

mysql> show databases;
+--------------------+
| Database           |
+--------------------+
| information_schema |
| mysql              |
| performance_schema |
| sys                |
+--------------------+
4 rows in set (0.00 sec)

mysql>
これで、Ubuntu 18.04にMySQL8のインストールが完了しました。
まとめ


- インストール前に、旧バージョンのMySQLをアンインストールする
- MySQLのリポジトリ登録は、専用パッケージの利用が便利
- MySQL 8をインストールしたら、専用コマンドで最低限のセキュリティ対策をおこなう
- 最後にmysqlで疎通確認をおこなう


